Survey Form Deployment and Data Pipeline
28 Mar 2023 - Sudip Shrestha
This project is about collecting data by doing survey. Simply, survey data on social media usage is collected. We will be using deploying a single page that contains the survey form to the public internet. We will collect all the data on the MongoDB database. We will create an API that helps to fetch all the survey data from the MongoDB database. You can see the deployed survey form in this link.
After deploying the survey form, we will create a data pipeline that consists of fetching the data from the database and cleaning the data for further use in visualization and analysis. We will be using Airflow for scheduling these two processes one after another. Airflow is an open-source platform for developing, scheduling, and monitoring different workloads. It provides a graphical user interface to manage our workloads.
Code Availability
Survey Form here
Data Pipeline here
Technology Used
HTML, CSS, Javascript
Nodejs(version 16.17.0), MongoDB
Airflow
Steps for deploying and pipelining
Step 1: Create a Survey Form
Create a directory named your_directory_name. Create a simple survey form in index.html about social media usage by individuals inside your_directory_name. The field includes the name, age, sex, social media preferred, and frequency of usage.
Step 2: Create a node.js server
On your_directory_name run, the command npm init –y. After that install express, body-parser, and mongoose.
npm install express body-parser mongoose
_**Create a Model folder and create a file named **_Survey.js This file includes the schema for the database. Write the following code to create a mongoose schema.
const mongoose = require('mongoose');
const Schema = mongoose.Schema;
const surveySchema = new Schema({
    name: {
        type: String,
        default: 'Anonymous'
    },
    age: {
        type: String,
        default: 'Not Specified'
    },
    sex:{
        type: String,
        default: 'Not Specified'
    },
    platform:{
        type: String,
        default: 'Not Specified'
    },
    frequency:{
        type: String,
        default: 'Not Specified'
    }
});
module.exports = mongoose.model('Survey', surveySchema);
After that,Create a server.js file. Write the following code to start the server at port 3000.
const express = require('express');
const app = express();
const bodyParser = require('body-parser');
app.use(bodyParser.json());
const port = 3000;
const survey = require('./Model/Survey');
//connect to mongodb
const mongoose = require('mongoose');
mongoose.connect('mongodb+srv://<your_mongodb_username>:<your_mongod_password>@cluster0.iwq7e3d.mongodb.net/<collection_name>', {useNewUrlParser: true, useUnifiedTopology: true})
.then(() => console.log('Connected to MongoDB...'))
.catch(err => console.error('Could not connect to MongoDB...'));
app.listen(port, () => {
    console.log(`Example app listening at http://localhost:${port}`);
});
Add this code to serve the index.html on running the localhost:3000/
app.get('/', (req, res) => {
    //respond the static index.html file
    res.sendFile(__dirname + '/index.html');
});
Now create an endpoint that handles the post request of saving the survey data to the MongoDB database.
app.post('/survey', async(req, res) => {
    const obj = new survey({
        name: req.body.name,
        age: req.body.age,
        sex : req.body.sex,
        platform: req.body.socialMedia,
        frequency: req.body.frequency
    });
    await obj.save().then((data)=>{
        res.status(200).send('Data saved successfully');
    })
    .catch(err => {
        res.status(400).send('Unable to save to database');
        console.log(err);
    });
});
To provide all the data, add this code to endpoint “/data”
app.get('/data', async(req, res) => {
    try {
        const data = await survey.find();
        res.json(data);
    } catch (err) {
        console.error(err);
        res.status(500).send('Server Error');
    }
});
After that, we need to send the post request from the frontend part so, add this code to index.html.
await fetch('http://localhost:3000/survey',{
      method:'POST',
      headers:{
          'Content-Type':'application/json'
      },
      body:JSON.stringify(data)
  }).then((res)=>{ //your code here
  }).catch((err)=>{ //your code here
})
Step 3: Deploying to Render Platform
To deploy the application, we need to create a repository in our GitHub. After pushing all the code to the repository. We can log in to the rendering platform with a GitHub account. Click on the new button, list of services will be seen. Click on web service. It provides a free plan for web services. Click on the free plan. A new page appears where you can connect your repository.
You can visit this youtube link for guidelines.
Note*: Sometimes node engine errors might arrive during deployment. Add .nvmrc in your directory with the specific required version of the node engine.
After that, you need to change the endpoint with deployed URL in index.html. Update the endpoint by removing ‘http://localhost:3000/survey’ to render the service URL like ‘https://your-webserviceurl.com/survey’
Step 4: Data pipelining using Airflow
We need to install airflow. I have to install airflow in windows(wsl). You can install it by watching this guideline video link.
Under the file directory dags, create a new dag for fetching and cleaning the data fecthingandclean.py. Also, create new folder data with a subfolder surveyData as shown in the figure.

dags and data folder
In fetchingandclean.py, we need to import the necessary files first.
import requests
from airflow import DAG
from airflow.operators.python import PythonOperator
from datetime import datetime
import pandas as pd
import os
import csv
import json
After that, we define a function that performs the workload of fetching the data from MongoDB collection. The response from the URL is in string form so, we need to convert it to a list using a JSON package.
def fetchData():
    try:
        url = “https://your-webserviceurl.com/data”
        response = requests.request("GET", url)
        data= response.text
        data = json.loads(data)
        flocation="yourpath/data/surveyData/surveyData.csv"
        if not os.path.exists(flocation):
            open(flocation,'w').close()
            with open(flocation, 'w', newline='') as f:
            # Create a csv writer object
                writer = csv.writer(f)
                # Write the header row
                writer.writerow(data[0].keys())
                # Write the data rows
                for row in data:
                    writer.writerow(row.values())
        else:
            with open(flocation, 'w', newline='') as f:
            # Create a csv writer object
                writer = csv.writer(f)
                # Write the header row
                writer.writerow(data[0].keys())
                # Write the response.text rows
                for row in data:
                    writer.writerow(row.values())
    except:
        print("error while fetching")
After that, create a cleanData function workload.
def cleanData():
    try:
        flocation="yourpath/data/surveyData/surveyDataClean.csv"
        if not os.path.exists(flocation):
            open(flocation,'w').close()
        df= pd.read_csv("yourpath/data/surveyData/surveyData.csv")
        #remove duplicates
        df = df.drop('__v', axis=1)
        df = df.rename(columns={'_id': 'userID'})
        df= df.drop_duplicates()
        df.to_csv(flocation,index=False)
    except:
        print("Could not clean the data!!!")
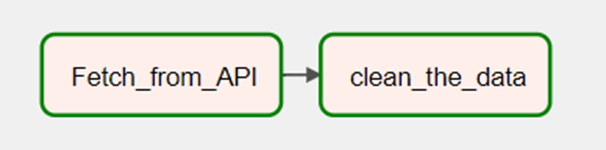
Now create a DAG
with DAG(dag_id="SURVEY-DATA",
        start_date=datetime(2023,3,25),
        schedule_interval="@hourly",
        catchup=False) as dag:
        fetch = PythonOperator(
            task_id="Fetch_from_API",
            python_callable=fetchData
        )
        clean = PythonOperator(
            task_id="clean_the_data",
            python_callable=cleanData
        )
fetch >> clean
Step 5: To run this you can type the following code in a different terminal.
airflow webserver
airflow scheduler
Now you can visit the airflow home page at “localhost:8080”. Select the SURVEY-DATA dag and you trigger it to run. You can view the graph from UI.
After running the dags, the data folder must have two files shown below.
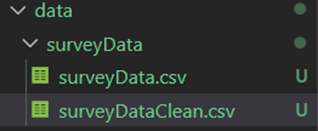
We have successfully deployed the survey form and made a data pipeline using airflow. The collection of data and cleaning can be scheduled at certain intervals of time like hourly which is written in the DAG code above.
Code for Nepal would like to thank DataCamp Donates for providing Sudip, and several other fellows access to DataCamp, to learn and grow.