Getting Started with GreatAPI - A Comprehensive Tutorial
06 Jul 2023 - Sahaj Raj Malla
GreatAPI is a powerful Python framework that aims to simplify and accelerate the process of building web applications, endpoints for Machine Learning models, and general APIs using FastAPI. This comprehensive tutorial will guide you through the installation and setup process of GreatAPI, and you will learn how to create a new project, manage apps, run the server, and build your API logic using GreatAPI.
Introduction
GreatAPI offers a range of compelling features that make it an attractive choice for developers seeking to build robust web applications and APIs. With its integrated Administrative UI, users gain effortless control over registered models, simplifying data management tasks. Additionally, the framework includes a built-in authentication system, boosting application security by facilitating user authentication and authorization. Furthermore, GreatAPI provides an intuitive project template, streamlining project setup and offering a structured foundation for rapid and collaborative development. GreatAPI’s seamless integration with FastAPI makes it a compelling tool for developing efficient, secure, and user-friendly applications. Embrace the boundless possibilities of web development, creating endpoints for AI models, and creating general APIs with GreatAPI and elevate your projects to new heights. Embark on an exceptional journey of innovation and excellence with GreatAPI at your side. Some of the major features of GreatAPI.
Requirements
Before we dive into the tutorial, make sure you have the following requirements in place:
- Python 3.6 or higher and PIP installed on your system.
- Familiarity with Python programming language concepts.
GreatAPI is built upon the foundation of the following robust libraries:
- FastAPI: A modern, fast, web framework for building APIs with Python.
- uvicorn: ASGI server that runs FastAPI applications.
- typer: A command-line interface library for building CLI applications.
- jinja2: A templating engine for Python.
- SQLAlchemy: A powerful Object-Relational Mapping (ORM) library for Python.
Installation
To install GreatAPI and its dependencies, use pip:
pip install greatapi
Getting Started
Step 1: Start a New Project
To begin working with GreatAPI, let’s create a new project. Open your terminal and execute the following command:
greatapi startproject myproject
This will create a new directory named “myproject” with the basic structure to get you started.
myproject/
├──init.py
├──settings.py
main.py
Step 2: Create a New App
An app in GreatAPI is a modular unit that encapsulates specific functionality of your project. To create a new app, run the following command:
greatapi startapp myapp
This will generate a new directory named “myapp” containing the necessary files and folders for your app.
myapp/
├──init.py
├──models.py
├──repository.py
├──router.py
├──schemas.py
Step 3: Run the Server
Now, it’s time to run the development server which will also create tables in the database for creating superuser in the next step. Execute the following command:
greatapi runserver
Step 4: Creating a Superuser
After running the server, let’s create a superuser to manage the administration of your project. Execute the following command:
greatapi createsuperuser
Follow the prompts to create the superuser account which will be used to login into GreatAPI Administrator.
The server will start, and you can access your application at http://localhost:8000/. Additionally, GreatAPI provides a beautifully designed built-in Admin Panel accessible at http://localhost:8000/admin.
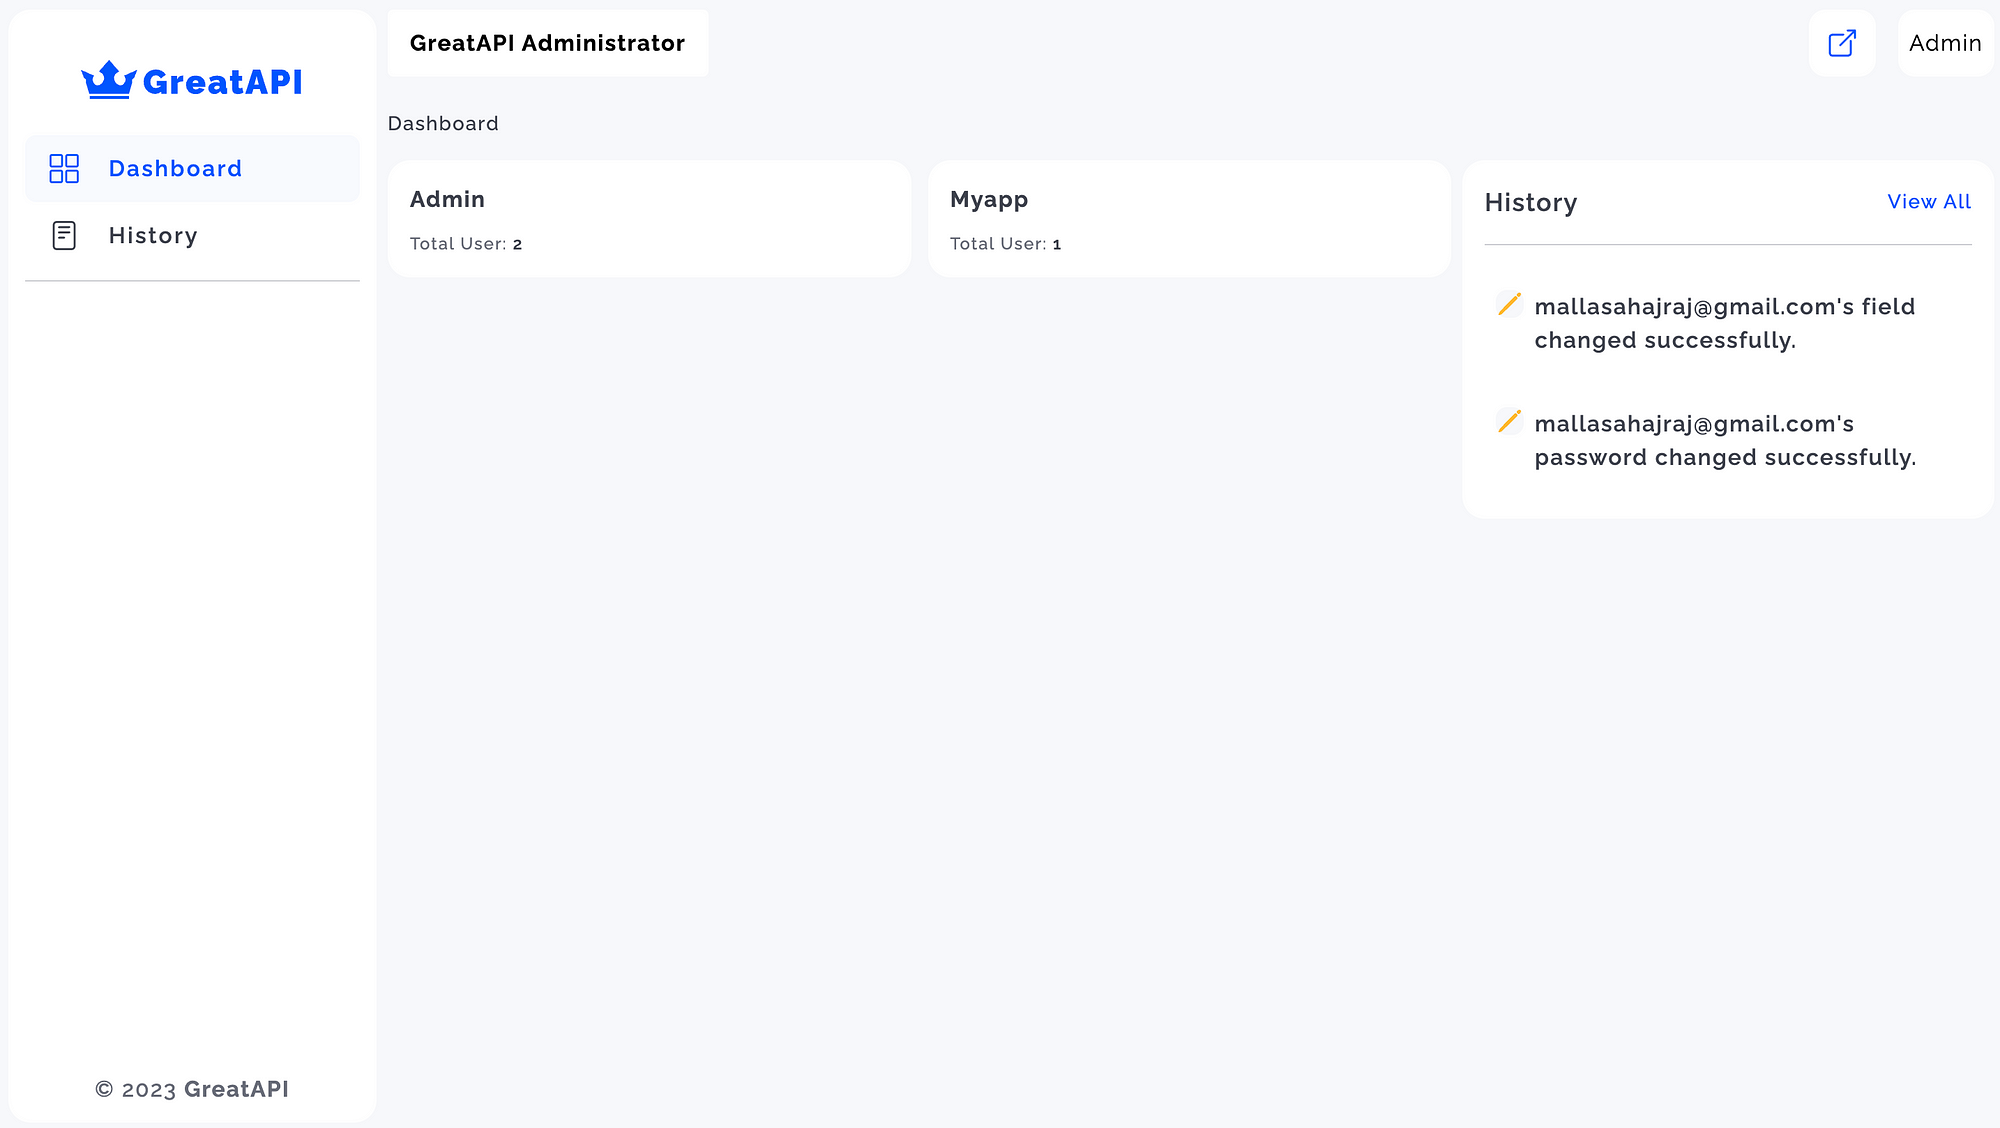
Landing page for Admin view
Building API Logic
GreatAPI is built on top of FastAPI, which allows you to easily implement your API logic for building a powerful API[such as blogs in this case]. Here’s a quick guide on how to do that:
Step 1: Add Models
Define your data models in the myapp/models.py file using SQLAlchemy syntax. For example:
from greatapi.db.admin.user import User
from greatapi.db.database import Base

from sqlalchemy import Column, Integer, String, ForeignKey
from sqlalchemy.orm import relationship

class Blog(Base):
    __tablename__ = "blogs"

    id = Column(Integer, primary_key=True, index=True, autoincrement=True)
    title = Column(String)
    body = Column(String)
    user_id = Column(Integer, ForeignKey(User.id))

    user = relationship(User)
Step 2: Add Schemas
Create Pydantic schemas in myapp/schemas.py to define the data validation and serialization for your API. For example:
from pydantic import BaseModel

class BlogBase(BaseModel):
    title: str
    body: str
    user_id: int  # Add the user_id field to represent the foreign key relationship

class BlogCreate(BlogBase):
    pass

class BlogSchema(BlogBase):
    id: int

    class Config:
        orm_mode = True
Step 3: Add CRUD Operations
Define the CRUD (Create, Read, Update, Delete) operations in myapp/repository.py using SQLAlchemy and your defined models and schemas. For example:
from sqlalchemy.orm import Session
from myapp.models import Blog
from myapp.schemas import BlogCreate

def create_blog(db: Session, blog: BlogCreate):
    new_blog = Blog(**blog.dict())
    db.add(new_blog)
    db.commit()
    db.refresh(new_blog)
    return new_blog

def read_blog(db: Session, blog_id: int):
    return db.query(Blog).filter(Blog.id == blog_id).first()

def update_blog(db: Session, blog_id: int, blog: BlogCreate):
    existing_blog = db.query(Blog).filter(Blog.id == blog_id).first()
    if existing_blog:
        for key, value in blog.dict().items():
            setattr(existing_blog, key, value)
        db.commit()
        db.refresh(existing_blog)
    return existing_blog

def delete_blog(db: Session, blog_id: int):
    blog = db.query(Blog).filter(Blog.id == blog_id).first()
    if blog:
        db.delete(blog)
        db.commit()
    return blog

def list_blogs(db: Session, skip: int = 0, limit: int = 10):
    return db.query(Blog).offset(skip).limit(limit).all()
Step 4: Create API Endpoints
Finally, define the API endpoints in myapp/router.py using FastAPI’s APIRouter. Link your CRUD operations to these endpoints. For example:
from fastapi import APIRouter, Depends
from sqlalchemy.orm import Session
from greatapi.db.database import get_db
from myapp.schemas import BlogSchema, BlogCreate
from myapp.repository import (
    create_blog,
    read_blog,
    update_blog,
    delete_blog,
    list_blogs
)

from typing import List

myapp_router = APIRouter(tags=["MyApp"])

@myapp_router.post("/blogs/", response_model=BlogSchema)
def create_blog_route(blog: BlogCreate, db: Session = Depends(get_db)):
    return create_blog(db, blog)

@myapp_router.get("/blogs/{blog_id}", response_model=BlogSchema)
def read_blog_route(blog_id: int, db: Session = Depends(get_db)):
    return read_blog(db, blog_id)

@myapp_router.put("/blogs/{blog_id}", response_model=BlogSchema)
def update_blog_route(blog_id: int, blog: BlogCreate, db: Session = Depends(get_db)):
    return update_blog(db, blog_id, blog)

@myapp_router.delete("/blogs/{blog_id}", response_model=BlogSchema)
def delete_blog_route(blog_id: int, db: Session = Depends(get_db)):
    return delete_blog(db, blog_id)

@myapp_router.get("/blogs/", response_model=List[BlogSchema])
def list_blogs_route(skip: int = 0, limit: int = 10, db: Session = Depends(get_db)):
    return list_blogs(db, skip, limit)
Step 5: Register Models and Endpoints
Import your models and API endpoints into the main application file main.py and register them with GreatAPI:
# ... (existing code)
from myapp.router import myapp_router
from myapp.models import Base as MyAppBase

# ... (existing code)
admin.AdminBase.metadata.create_all(engine)
admin.UserBase.metadata.create_all(engine)
MyAppBase.metadata.create_all(engine) # new code added

# ... (existing code)
app.include_router(admin_router)
app.include_router(auth_router)
app.include_router(user_router)
app.include_router(test_auth_router)
app.include_router(history_router)
app.include_router(myapp_router) # new code added
Finally, register your models in settings.py by appending the models into the REGISTERED_ADMINS such as:
from __future__ import annotations

from greatapi.db.admin.user import User
from greatapi.db.admin.default import History
from myapp.models import Blog # new code added

REGISTERED_ADMINS = [
    User,
    History,
    Blog, # new code added
]
With these steps, you have successfully set up your project, created an app, defined models, and built API endpoints using GreatAPI.
Conclusion
In this tutorial, you learned how to get started with GreatAPI, a powerful Python framework that aims to simplify and accelerate the process of building web applications, endpoints for Machine Learning models, and general APIs. You now know how to create projects, manage apps, run the server, and build API logic using GreatAPI. The combination of GreatAPI’s features and the elegance of FastAPI allows you to develop robust and efficient applications with ease. Now, it’s your turn to explore further and build amazing web applications with GreatAPI.
Happy programming!
Code for Nepal would like to thank DataCamp Donates for providing Sahaj, and several other fellows access to DataCamp, to learn and grow.